 Home
Home Variations
 Technical Data
 Contact
 Order
Order GTC
GTC German
 Italian
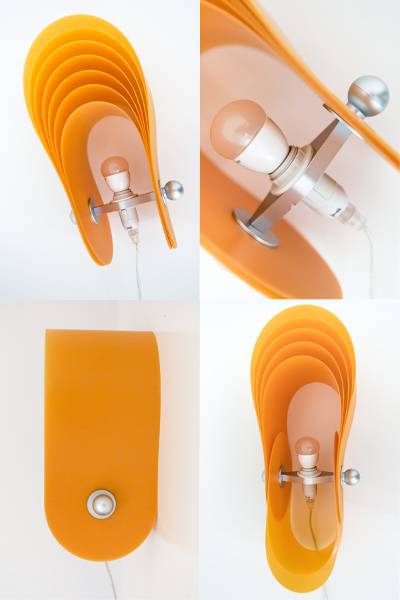
Description / Size
Ccoquille - Edition 2020
is a floor-, table-, wall- and ceiling lamp
Positioning in the standard form (shell-form) amounts to a size of ca. 40cm x 17cm x 17cm (L x B x H)
An edition in a smaller size is planned.
Material / Delivery contents
Shade lamellas: translucence, elastic polypropylene foil (material thickness 0,8mm)
Connecting axis: plastic
Bail, threaded rod, patch-up-disc, turning knob: : aluminium
Illuminant: LED
Cables
Delivery contents (Number of pieces)
Shade lamellas (7)
Knob (2)
patch-up-disc (4)
connecting axis (1)
u-bolt for fixture at wall/ ceiling (1) including screws (2) and plugs (2)
cable (1)
LED (1)
Directions for use
You can download the directions for use as pdf.
Adjust the lamellas
Turn left and right knob simultaneously in an anti-clockwise direction until they loosened a bit from the threaded bar and the lamellas might be shifted easily.
After the wished/ correct positioning of the lamellas retighten the knobs by turning both at the same time in a clockwise direction.
!!! Caution!!! Make sure not to over bolt the knobs as this may damage the lamellas as well as the screw thread or the threaded bar!!!
Exchange of the lamellas
Turn left and right knob simultaneously in an anti-clockwise direction until they loosened completely.
Then take off the outer patch-up-disc and lamellas.
Exchange the shade lamellas.
Look to it that the inner patch-up-discs are directly applied to the connecting axis.
While putting on the lamellas make sure that they are replaced according to their size. Start with the shortest then arrange the others according to their size and finally finish with longest lamella.
Start with attaching the lamellas only on one side to the threaded bar. Apply the outer patch-up-disc as well as the knob and slightly fix it by turning it in a clockwise direction. Next step is to do alike on the other side.
Now position the lamellas as wished and fix them by simultaneously turning the right and left knob in a clockwise direction.
!!! Caution!!! Make sure not to over bolt the knobs as this may damage the lamellas as well as the screw thread or the threaded bar!!!
Wall/ ceiling mounting
Light fixture at a wall or ceiling (brick work or concrete/cement)
Hold the U-bolt supplied at your intended mounting location and use a pen to mark the two bore holes through the template.
After drilling the two marked holes into the wall (please use a rock/ stone drill) with a diameter of 6mm insert the plugs into the holes. Please use the two screws and plugs supplied to fixture the U-bolt at the wall. A closure of the lamellar lampshade will simplify this step.
!!! When selecting a mounting location and drilling in the vicinity of switches or socket outlets, make sure there are no cables in the wall !!!
Connecting the lamp to the power supply (wall/ ceiling)
The device may be connected to the ends of the freely accessible power/ electrical cables.
The power connection has to be made by using a double isolated cord - the cords are labeled with blue = N/ neutral conductor, brown = P/ phase
!! Caution !!! This fixture must be installed by a qualified electrician who follows these instructions scrupulously and works in compliance with current regulations regarding electrical systems!!
LED / exchange
Disconnect main power before changing the LED. Ensure that the LED is fully chilled.
After changing the LED make sure that it is fixed tight.
After reconnecting to the main power the lamp may be used again.
!! Caution! Only from manufacturer recommended LED should be used !!
Safety advice
-Lamp is only suitable for the interior of the house and needs a dry environment
- Line voltage has to be identical with operating voltage
- Only manufacturer recommended LED should be used
- Before any mounting, maintenance operation or other work with the lamp the main power must be switched off
- To clean/ wipe the lamp use a slightly damp cleaning rag
- Lamp is not allowed to get in any contact with any kind of liquids nor being dipped in.
- If the device is damaged it must be switched-off immediately and may only be used again after being repaired by an expert
- Keep away from flammable materials and open fire
General advice
Read these instructions carefully before working with the lamp - all information concerning fixture of the lamp as well as exchanging the LED are given. Keep close attention to the safety advice. Keep the manual so you can refer to it at a later date if you need to. If you hand over the device to other persons for use, please hand over the manual as well.